

I’m just going to come out of the closet and say this: I actually hate budgeting. And I think so many of us have sucked at it because it actually inherently sucks. A budget is the harsh fluorescent light the morning after, revealing all of our past personal mistakes. Not being able to stick to a budget highlights just how out of control we are in our daily lives, like how we are powerless to marketing that connects with us emotionally or how the market or an employer dictates what we can afford and ultimately, how we live our lives. On the surface, a budget is a bunch of numbers, but at it’s core, it forces us to confront ourselves.
Unfortunately, for most people, budgeting is a really critical, foundation piece of having a good relationship with money and important for being able to do the crap they want to do in their lives. Creating a budget creates awareness and can lay the groundwork for making change in your life.
In this article, I’m going to walk you through one method to help you not suck at budgeting.
First you'll figure out how much you have been spending.
Then, you’ll map out a budget based on that.
And lastly, you’ll set up a system to help you stay on track.
Part One
First, figure out how much you have been spending
I recommend looking back at how you actually spent money before you project how much you think you’ll spend in the future. When the numbers are based on actual data, they’re more accurate. In other words, you’re reducing your chances of setting yourself up for failure because it’s come from a realistic place. Plus, if you need to have your come-to-Jesus moment about spending, going through your expenses can certainly give you that flash of insight. Three months of your actual spending is good enough.
Pick a Tool
I recommend picking a tool that works best for how you like to work. I have friends and clients who usually fall into two camps. The first camp are the ones who like physical calendars, printing papers and having tangible things. The other camp of friends are the ones who have an app for everything and they’ll spend lots of time researching a way to “optimize” something.
So, if you're in the tactical, I-like-to-touch-dead-tree-paper camp, you might want to print all of your bank and credit card statements for the last three months, spread them all over the ground, grab lots of highlighters and a calculator. If this sounds like your personal hell and instead you’re looking to optimize your life until it is a soulless series of interacting with things on a screen, the digital solution I recommend is Tiller HQ. It’s the best budgeting application I’ve ever seen - and I’ve been looking for a good one for almost 10 years. Here’s why I like it:
All the data goes into a Google sheet, not some clunky interface that can’t be sorted or exported.
Robust reporting isn’t sacrificed for the simplicity of it
It makes your data simple and easy to read and understand.
Yes, the application does cost money ($59/year), but there is a free trial so you can fly before you buy. It’s so good, I was happy to pay them for making such a great too; one I feel confident recommending.

Setting up Tiller HQ
If you’re using Tiller HQ, here’s what you’ll need to do:
Sign up for an account
Follow the prompts to link your accounts. You only need to link the accounts you spend money from, like a checking account and credit card.
Then Tiller will start to pull in the data
Once your accounts are connected, you’ll need to create a new Google Sheet. You’ll give it a title and choose the “Tiller Monthly Budget” Google Sheet template. Hit the “Create Google Sheet” button and Tiller will take a minute or two to populate the data and create the sheet. Once it’s done, you’ll be able to hit the “Open Sheet” button.

Once the sheet opens, the first thing you’ll want to do is hit the “Categories Tab” to add, delete or edit categories you need and to add a “Group” to each category.
The three main categories you’re going to use are as follows:
Bills & Life
This group is for all of your necessary bills and expenses. Most people agree that rent, utilities, childcare and student loan payments fall under this category. But not everything has hard-and-fast rules about whether or not it’s a necessity in your life. For some people a housekeeper is a necessity and for others it’s not. Use your discretion.
Fun & B.S.
This group is for all the fun, but not necessary expenses. It’s for all the stuff that adds texture and color to your life. Most people put hobbies, clothing, general shopping and vices under this group.
Future & Goals
This group is for all of the saving and investing you’re doing now for your future self. The amount you save each month for retirement, your emergency fund, your kid’s college fund, your I’m-going-to-start-a-business someday fund and whatever else you’re saving for in the future are all in this group.

*CAVEAT #1: There is a caveat here with how to categorize your credit card payments: as transfers or as expenses? If you are still using your credit card for spending (maybe you are gaming the points), then you’ll want to make sure it’s also loaded into Tiller HQ, that you’re categorizing the expenses and that your payments are categorized as a transfer. If you are paying off your credit card debt and not using it anymore (recommended if you don’t trust yourself with a credit card), then don’t load your credit card into Tiller HQ and classify your credit card payments as an expense.
Next head to the “Transactions” tab. You’ll need to do a little modification so that the Groups we just added will show up on this tab and on your reports.
Right click on the Account column and choose insert 1 right so that you have a new column to the right of the Category column. Override the recommendation not to make edits.
Paste this formula into the header (row 1) for this new column: =arrayformula(if(row(B1:B)=1,"Group",iferror(vlookup(D1:D,,2,FALSE))))

Now, you’ll take some time to categorize your transactions for the last 3 months (or 90 days). Depending on how many transactions you have each month, it could take 30 minutes to over an hour. If you don’t have the time to do it right meow, I suggest blocking off an hour and a half on your calendar to do it. Or if you’re awesome, you can do it during your weekly finance time.
*CAVEAT #2: If there were any expenses that didn’t get captured over the last 90 days, like a one-time, annual payment, it won’t be reflected in these numbers. So you can make a note to add it back in later or you can modify the transactions tab to simply add it as a monthly expense. For example a $1,200 payment that you make annually for insurance would be added as $100/month on the transactions tab because $1,200 a year / 12 months = $100 / month. Now you should have a pretty accurate picture of your budget.
Part Two
Reflect, Review and Make Adjustments
Ok, now that you have all your spending data categorized it’s time to look at it and analyze it.
To view your spending in each group and category, you’ll need to add something called a pivot table.
On the Transactions tab, select all the transaction data in your sheet by clicking the square in the upper left corner of the sheet.
Open the Data menu and choose "Pivot table..." from the list. Google Sheets will create a new sheet and add the pivot table, which will reference the selected data from the Transactions sheet.
From the pivot table editor choose “Groups” for the rows. Note: the pivot table editor appears on the right side of the screen anytime you click anywhere inside the pivot table.
Add another row and choose “Categories”. Note: It’s important that Groups is above Categories so you can view all the categories within the group.
Choose “Month” for the columns.
Choose “Amount” for the values and leave the summarize by SUM.
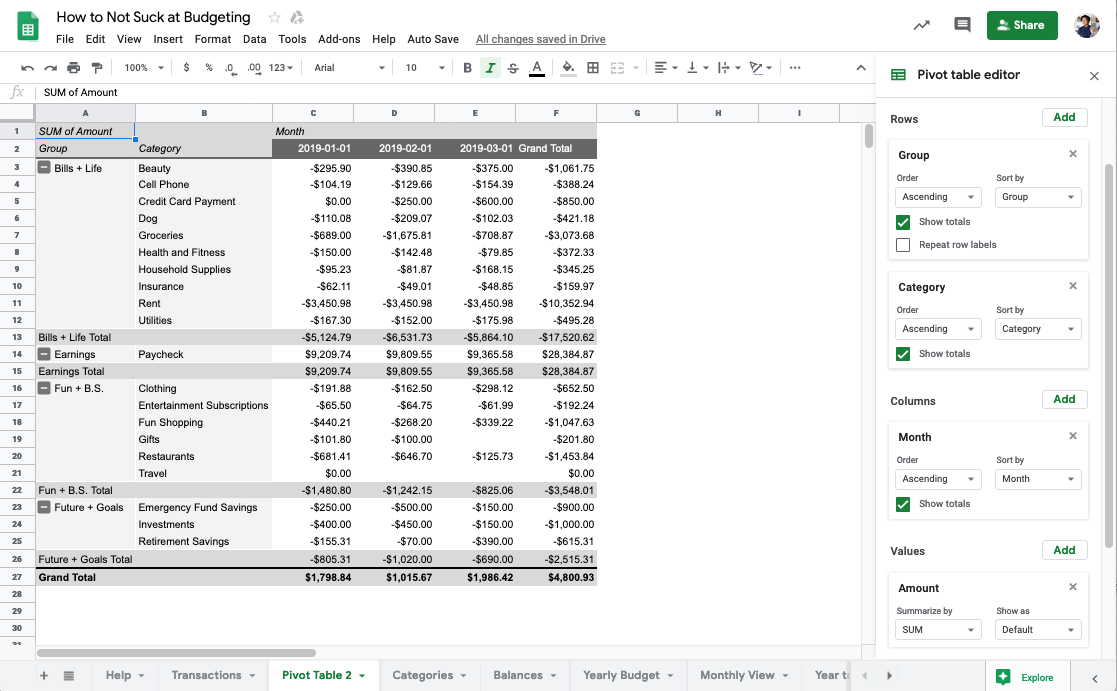
If you see a lot of variance from one month to the next, ask yourself why. For example, let’s say in December, I spent $1,500 on travel and in January and February, I spent next to nothing. That makes sense to me because I went on vacation, but I also used money that I had saved up throughout the year.
Now that you’ve had to put your eyeballs on your numbers, you might be experiencing feels. Totally normal. Whatever your feels are - shock, horror, relief, satisfaction, elation, frustration - if you need permission to feel them, then this is me giving you permission. Make sure to listen to what’s coming up. Try to find something to be grateful in the story of your budget, like maybe you traveled or you started an emergency fund or you maxed your retirement. I know you want to judge yourself, but try to fight the urge. Sometimes we make weird choices with our money, but this exercise is you getting things on track.
You probably know if you need to make adjustments. For example, if you’re spending more than you earn, you need to find ways to adjust your expenses down and/or make more money. Finding ways to cut expenses is often times the quickest way to reallocate funds to another category or to reduce your expenses all together. Finding ways to earn more money typically takes more time to feel the positive effects. For example, taking on more work or creating a new revenue stream can result in more money, but you won’t feel those effects right away.
Make a future-looking budget
Finally, it’s time to take the historical data to make a future-looking budget.
Use the cells in the column next to the pivot table to make a monthly budget for your expenses. A good way to make a projection is to first look at your average monthly spend in each category and group. Then project a monthly budget number based on the average.
Make sure to prioritize savings and investing, unless you have already totally reached your financial goals and you’re on track to retire in 2 years, then you probably don’t have to save or invest. If you haven’t been saving anything at all, just start saving something. $100 a month or $90 or $25 if that’s really all you can afford.

Make sure the total expenses do not exceed what you’re able to earn in income. You can also take this opportunity to do that super-annoying, but very practical thing where you try to reduce your fixed expenses. Here are some examples:
Cancel any subscriptions you are not using, like magazines or apps. Remember, you can always resubscribe if you need to, but if you aren’t using it now, chances are you won’t notice that it’s gone.
Call your cell phone service provider and see if there is a better, cheaper plan. I know, it’s annoying, but I whenever I see my cell phone bill has crept up, I call them and ask them to help me reduce my bill or because some other cell phone provider offered me a better deal.
Find other ways to reduce bills by getting more energy efficient light bulbs, fixing your leaky faucets and unplugging those 19 cell phone chargers that you aren’t using.
Part Three
Setting up Fail-Proof Systems
Now that you’ve looked back and projected forward, the next step is to set up a system to help you stay on budget - arguably the hardest part of this whole situation.
Here’s how the fail proof system works:
Set up two separate checking accounts - One checking account for all the bills & life expenses and one checking account for all the fun & b.s. expenses.
Separate your spending - Only pay for bills & life expenses out of the bills & life account and only use the fun & b.s. account for the non-essentials in your life.
Separating your fun & b.s. spending will allow you to impose a cut-off amount to your non-essential spending. If you don’t separate it, you’ll need to keep track of your fun & b.s. spending to always make sure you know how much is safe to spend considering your bills & life. And if you have had trouble keeping track in the past, chances are you will have trouble in the future. Hence, my method of budgeting that doesn’t require tedious tracking.
Actually implementing the system means each time you get paid, you’ll need to split up your paycheck according to each group.
There are a few different methods to how you can fund your bills & life, fun & b.s. and savings from your paychecks. Here are your options:
Option 1 - Automate It

If you can set up your direct deposit to go into multiple accounts, this might be easiest because you don’t have to worry about automatic transfers. For example, let’s say you get paid $1,150/week and your employer allows you to set up multiple direct deposits. Let’s say you have $150 that automatically goes to retirement, then you break up the remaining net paycheck:
$500 gets deposited into your bills & life checking account
$300 gets deposited into your fun & b.s. checking account
$200 gets deposited into your emergency fund savings account
It’s nice to have a buffer in your bills & life account because you probably have a bunch of bills that get paid throughout the month. A buffer will be help if there are any weird timing issues. If you don’t have enough of a buffer, you might need to spend some time figuring out a schedule for paying your bills. Usually you can call and have the due dates changed. Yes, you have to sit down and make phone calls and it’s annoying, but it’s not hard.
Option 2: Do it your damn self

This is the most time intensive method, but I don’t hate it because it forces you to look at your finances regularly and to be engaged with them. You would basically sit down and make your transfers every time you get paid. This method is usually good for freelancers who are just getting their footing with their finances. It’s a big reason why I’m a proponent of weekly finance time.
Getting a good flow set up with this system may take some time. If you are getting your expenses under control for the first time, you might need to do something drastic like severely (or entirely) cut fun & b.s. spending for a month or six weeks to get going in the right direction. If you have credit card debt that you’re trying to get out of, you might need to call your credit card companies to impose a spending limit each month for your fun & b.s. or you might decide that it’s probably better for you not to use credit cards.
Part 4
Edit at least annually
You are like the ocean: dynamic, always moving and always changing. You are reaching goals and modifying them as you grow and become a different person. It’s a good idea to go through this exercise at least annually. It’ll give you an opportunity to reflect. Did you reach any major milestones like funding your emergency fund? If so, now you can start funneling the amount you were saving to your next goal. Or maybe your goals for your life have changed from wanting to buy a house to wanting to take a year off and traveling the world. Give yourself the space to reflect and change.
Another reason to edit is to help you combat against "lifestyle creep”. Lifestyle creep happens when your expenses rise in tandem to your income. If your income goes up with annual raises or bonuses and you aren’t careful, cognizant and watchful, it’s easy to up your spending as your income increases. It’s a good problem to have and you can catch yourself and get back on track when you go back and edit your budget.